Ski Waxing Information
Basics
Which skiing disciplines does this guide apply to?
The Art of Waxing is a force that binds all those who slide on snow together, be it that they ride on one stick or two, are of free-heel or no, go downhill or up. Some would say that the tiniest pore of P-Tex base material is a microcosm of the known Universe. Others still would say this is nonsense. But the indisputable fact of the matter is that ALL of our winter glisse equipment is equal in the eyes of The Wax. Your snowboard needs it, your Nordic skis need it, your Telemark skis need it, your soul needs it.
So, if you own: Alpine skis, Skate skis, Telemark skis, a Snowboard or Classical Nordic Skis, AND you actually want to learn a bit about the theory of waxing and maybe even how to wax your own equipment, then this guide applies to you. If you live in Florida and you’ve stumbled across this site while searching for online antique sales, hit your browser’s back button now.
Note: Though we have tried to be fair and impartial with respect to all snowsport equipment, sometimes it was just easier to pick one style of gear and stick with it throughout an explanation. Example: “To clean your ski, spray a small amount of…To see if your ski bases are dry, flip them over and…More sidecut makes your skis turn quickly…etc, etc. Assume that (using common sense) the tips apply to all snow-sliding equipment, unless they clearly don’t.
There are so many waxes and tools…where do I begin?
Come into our shop and you are arrested by a startling number of colorful wax tins, each labeled with cryptic symbols and temperature ranges in degrees centigrade. Scrapers, both plastic and metal hang above brushes with bristles of brass, nylon and horsehair. You begin to sweat. Casually picking up a ski tuning gadget, you find it impossible to figure out exactly what the heck it does. And for that matter, what is klister, really? How about fiberlene and fibertex? By now, all eyes have turned toward you. A bead of sweat hangs suspended from your nose. But no, it’s not sweat, is it? Dots of wax. Dots of molten wax. You hope the alarm will sound soon, so you can wake up from this nightmare and normality will be restored…
DON’T PANIC! This is good advice from the Hitch Hiker’s Guide to the Galaxy.
All skis need wax, but the amount and complexity of the work involved really depends on the skier to whom they belong. A fellow who races in Nordic marathons will pay more attention to detail than someone who gets out a couple times a season, even if they both happen to use the same exact ski model. Waxing can be as easy as you desire, so don’t feel as through you need a master’s degree in alchemy to succeed. Our advise is to start simple with a few basic tools and build from there if you enjoy it.
Though in the following sections you will find technical advice on preparing new ski bases, layering glide waxes and tips on all of the various tuning instruments, remember that we don’t intend you to assimilate and practice every little technical procedure if you are new to the basic concepts. Again, start simple. Focus on using your equipment first and having fun. Feel free to come in and take advantage of our experienced staff with any tuning questions you might have. Remember, we are a full-service shop, so we’d be glad to do any of the procedures outlined below for you if you’re not comfortable with them or simply lack the time. If you are interested in learning how to enhance the performance of your own skis yourself, however, read on.
What types of wax are there? Why do you need wax?
The first step on the path toward Waxing Enlightenment is understanding that there are two basic categories of wax, kick wax and glide wax.
Glide wax makes you, well, glide more effectively across the snow. The better the glide wax job on your skis, the faster they will run. And Friction has much less to say about it. Everybody uses glide waxes: snowboarders and alpine, cross-country and telemark skiers. It comes in a liquid or paste rub-on form, solid block form (that is typically melted into the ski base with a waxing iron) and appears as expensive high-end powders for racers. An un-glide-waxed ski base is dry, often white in appearance, and is sluggish through turns and in speed. Keeping your boards saturated with glide wax is much like keeping your bicycle chain lubricated with oil—both you and your equipment work better.
Kick wax is typically used only by Nordic (or “cross-country”) skiers. It does the complete opposite of glide wax; it allows the skis to “grip” the snow. Nordic skiers need grip just like a hiker needs tread on her boots, because they must be able to climb and traverse flats in addition to sliding downhill like their alpine friends. Kick wax comes in solid block form, and the skier crayons it on to the middle third of the base and buffs it in with a cork. Because of a classic skis camber, the kick wax job only contacts the snow when a Nordic ski is fully weighted, so in this way the skis are able to kick and glide. “Waxless” Nordic skis are a popular choice because they have a tread-like pattern on the base that provides grip, eliminating the need for kick wax.
All kick waxes and most glide waxes are temperature-specific, meaning that they have a certain functional snow-temperature range. You’d use a different glide wax for warm spring snow than you would for deep and dry February powder because the chemical properties of the snow are very different. The rub-on waxes are generally temperature universal for convenience and iron-in block forms also come in a universal warm and a universal cold.
If I’m just starting out, what are the basic tools and waxes I need?
Alpine (Downhill)/ Tele Skiers and Snowboarders
You’ve got a few options. The quick and easy path is to grab one of the following glide waxes:
Swix F4 Liquid Glide Wax
Swix F4 Paste Glide Wax
Both work fine you don’t need any special tools; just rub on the entire base surface, polish and go.
Why would anyone get more involved than that? The iron in waxes give you more glide throughout the temperature range, protect your base more, and last quite a bit longer. If you would like to follow the righteous way of the hot iron wax, some specialized tools and waxes are in fact required here is a minimal list:
A clamp set and a bench to hold the ski in place
Glide wax cleaner
Iron (preferably one designed for ski waxing)
Plexi Scraper
Bronze or Nylon Brush
Swix Universal Warm Wax
Swix Universal Cold Wax
That should get you started nicely. Come in and talk to us about ways to expand your downhill-oriented waxing kit if you want to move beyond the basics. In the meanwhile, enjoy a plentitude of turns.
Classical Nordic Skiers with Waxless Skis
So you’ve got waxless Nordic skis, eh? If you are reading this far you probably understand that waxless skis still need to be glide waxed. The easiest single thing to buy is:
Swix Easy Glide Liquid for Waxless Skis
Rub it on the entire length of your ski, including the waxless pattern. This reduces friction on the fishscale surface and allows it to glide more freely. It also prevents clumps of snow from adhering to the pattern and ruining your day.
Yes, you can (and we recommend this) hot wax the tips and tails of your waxless Nordic skis, if you are interested in performance. To do this, you’ll need:
A clamp set and a bench to hold the ski in place
Glide wax Cleaner
Iron (preferably one designed for ski waxing)
Plexi Scraper
Groove Scraper
Bronze or Nylon Brush
Swix CH10
Swix CH8
Swix CH6
You can subsitute a single Universal Warm or Cold wax for the three Swix waxes above to save some cash.
Skate Skiers with, you guessed it, Skate Skis
A skate ski possesses a single gliding surface, much like its alpine comrades. When you glide wax your ski, you coat the entire base. The simple route is to pick up either:
Swix F4 Liquid Glide Wax
Swix F4 Paste Glide Wax
You don’t need any special tools; just rub on the entire base surface, polish and go.
To join the ranks of initiated hot waxers, you’ll need some extra toolage.
A clamp set and a bench to hold the ski in place
Glide Wax Cleaner
Iron (preferably one designed for ski waxing)
Plexi Scraper
Groove Scraper
Nylon Brush
Swix CH10
Swix CH8
Swix CH6
You can subsitute a single Universal Warm or Cold wax for the three Swix waxes if you’re on a budget.
Classic Skiers with Waxable Skis
Your story is a bit different from the rest, because in additition to glide waxes & tools (you’ll use the same here as the skate skier above), you require kick wax to move forward. This makes you special. Unlike many things in life, ski waxing is a very fair enterprise. Since it takes a little more work to apply kick wax, you get better grip and kick as a result, just as you would expect. Yee-haw! As far as glide wax is concerned, just read the above portion for skate skis and remember that you’re applying it ONLY to the tips and tails of your classical skis. Kick wax goes in the middle 1/3 zone under your foot (it doesn’t adhere very well to glide wax). In addition to the aforementioned tools for glide wax, for kick waxing you’ll need:
Synthetic Cork
Swix Blue Extra
Swix Violet Special
Swix Red Special
Swix Red/Silver
Base cleaner
Don’t feel as though you need to buy all the waxes at once. You can do it in stages if you like, buying when the conditions dictate. Those waxes should form the nucleus of an excellent kit, however. Purchase a Universal Klister for those tricky warm conditions or frozen tracks if you like, and happy trails.
Glide Waxing
What are the different types of glide waxes and how do they work?
Glide wax is formulated to bond with and be absorbed into your polyethylene (fancy name for a particular plastic, often called “P-Tex” for short) ski base. It is designed to do two things for a ski:
- It keeps the ski base lubricated and prevents it from drying out. Oxidization, or the act of combining with oxygen, is the same fundamental process that rusts a steel bicycle chain; this leads to poor shifting performance and eventually no shifting at all. That is why it’s good practice to keep a bike chain oiled. Your ski or snowboard bases turn white when they oxidize, generating excessive friction that slows forward glide and creates obvious drag during turns.
- It lends to the base the proper hardness and water-repellent characteristics to glide over snow. A ski base that is waxed with a particular cold-temperature glide wax will work great when the snow is dry and fluffy and the temp is 20 degrees, but if it is left on and skied on a sunny and wet Spring afternoon, those same skis will feel incredibly sticky. Snow has different properties at different temperatures, and specific waxes provide the best glide in these particular conditions.
The glide wax we seek comes in several different forms:
- The quickest and easiest to apply is a liquid wax, done by rubbing the glide zones with a provided applicator.
- Paste waxes perform a little bit better but must be buffed in by hand (requiring a little more elbow grease).
- By far the most penetrating and durable waxes come as solid blocks and are meant to be melted and ironed in to the ski base.
Whichever form of wax you choose, your ski base is actually meant to absorb the wax, drawing it inward like a plasticky sponge. Ski bases are porous, being endowed at the factory press with microscopic holes. The aim is not to ski on a visible layer of wax, rather to ski on a wax-impregnated base. Surface wax does nothing except create friction, which is why you polish it in (with liquid and paste waxes) or scrape it off in the case of hot waxes. The liquid and paste varieties are typically termed “Universal” gliders, meaning that they work reliably in any temperature, though they don’t last as long nor work as well as iron-in waxes. The blocks of solid iron-in wax have specific temp ranges that they’ve been engineered for and are the best thing for ski/snowboard glide. Below is a little bit of theory to help you understand how temperature-specific waxes work.
Quick and Dirty Glide Wax Theory
In colder conditions, snow crystals are very hard and dry with sharp edges. You couldn’t make a snowball to save your life because of the low moisture content. The character of your ski base must be hardened to match this snow with the application of a cold-temperature glide wax. As it warms above 15 degrees F, the friction from ski passing over snow begins to create a thin film of water. Higher ambient temperatures allow more water to be generated because more water resides in the snow. The snow itself is wet with soft, rounded edges-perfect for snow forts, snowball fights and bruised egos. Softer warm-weather waxes deal the best with all this wetness and water production to provide optimum glide in these conditions. In sum, warmer waxes are softer and colder waxes are harder. Waxes formulated for warm days have lower melting points as well, which dictates the temp setting on your waxing iron if you’re hot waxing.
So How Do You Choose a Temp-Specific Wax?
As we’ve explained above, almost all temperature-specific glide waxes come in solid-block form and are designed to be melted directly onto and into your ski base, a procedure known as “hot waxing.” . A few special tools and some rudimentary skills are requisite, but the hot wax job lasts longer and works much better than the rub-on varieties. The amount of invested labor is roughly proportional to the quality of the glide, in other words.
Select the wax with the temperature range that most closely matches what you’ll be skiing in. If it is 28 degrees F outside, you might choose Swix CH8, with its range of 34 to 25 degrees. That’s about all there is to it folks. The temperature ranges listed on the packages actually correspond to snow temperature, but most people still just use air temperature as a reliable indicator. As you gain experience, other factors may begin to influence your wax decisions, but keep things simple to start. And don’t think you are doomed to iron in new glide wax before each day of skiing; again, the correct amount to wax depends on your spare time, the tools available, how much you ski and how much performance you want out of your equipment. A hot wax at the beginning of the season and one during the midpoint is a good rule of thumb for most casual skiers. Cross-country and skate skier professionals (both Nordic and alpine), on the other hand, race only on freshly waxed boards. We at Omer and Bob’s (being avid skiers and riders) hot wax our personal equipment roughly every one to five times out. Find your own niche.
When is the time to apply more glide wax to my skis or board?
Normally, your equipment will tell you when it needs a drink of wax: Glide will be slower than what you’re used to. The timeframe depends on a great number of factors, including the amount of days spent skiing, snow conditions, quality and type of the previous wax job, etc. It’s impossible to give an exact trail mileage or number of slope days. Those who ski infrequently certainly do not need to pay their ski bases this much attention; some people will wax their skis once a season, others will wax them thirty times. The more you ski or ride, the more attention (in the form of wax) your boards will require. You’ll also expect more performance out of your equipment, and the frequency of your wax applications will reflect this.
That said, it’s a good rule of thumb to freshly glide wax your board(s) prior to each day (or weekend) of skiing or riding. Just as you would clean and relubricate your mountain bike chain after a muddy ride, so should you wax your skis after the winter equivalent.
To do a visual check, flip your boards over and examine their bases; a black base with lots of white streaks on it is rather dry, in contrast with the smooth, polished look of the freshly waxed. Over time, friction and pressure pull the protective wax out of the base, causing the plastic base material to oxidize and dry out; this is the same fundamental process that rusts your bike chain (well, that coupled with your continually leaving it out in the rain). Alpine skis and snowboards often get what we call “base burn”, manifesting itself as a series of white streaks near the edges where pressure is greatest during turns. Ugh-lee. As you become more experienced and more discriminating, slow skis will reveal themselves to you more readily.
What is the easiest way to glide wax my waxless Nordic skis?
Waxless skis do not need kick wax. The crown pattern (or “fishscales”) cut in or pressed on to the base provides the grip. To repeat, the “Waxless” designation only refers to the freedom from kick wax. But, like any ski, they need to be glidewaxed.
The simplest method is to buy some of the Swix Easy Glide liquid wax and use the included applicator to smooth it over the entire length of your ski base, including the waxless pattern. Let the wax set for 15 minutes or so, then hit the trails. Glide wax on the ski’s kick pattern will prevent water from penetrating the ski and freezing, which is what’s responsible for snow balling up underfoot (otherwise known as “The Bane of Waxless Skis”).
Liquid waxes work fairly well in all temperature ranges. Though a liquid wax does not penetrate nearly as far into the base as a hot wax, you’ll still see plenty of benefit for a fraction of the labor. In addition to increased glide, liquid waxes also protect your base from drying out and oxidizing (just not as well as a hot wax). After every couple of liquid wax jobs you should clean the dirt from your bases with some base cleaner before you wax again. Generally each application will last about 20 miles.
The easiest solution: rub on, let dry and go.
Are glide waxes for alpine skis and snowboards different than what Nordic skis use?
All skis and snowboards enjoy a good glide; cross-country skis are the only odd balls, being the happiest when a bit of grip is thrown in as well. If the temperature of the day hovers around 15 degrees F, you will be hot waxing both your Nordic skis and your snowboard with an identical block of blue Swix CH6. Regardless of the specific application, you will use the same glide waxes and selection criteria for all of your snow sliding equipment. Classical Nordic skis are the only ones that use kick wax.
Downhill equipment (Alpine, Telemark, Snowboard): Most people will receive enough performance out of one of the Swix Universal waxes; they have rather broad temperature ranges (30+ degrees), so you can easily use the Universal Cold throughout most of the winter and switch to the Warm when spring conditions arrive. You’ll notice glide improvements on low-angled slopes and while skating across the flats, but more important is how easily your boards slide across the snow into a turn. Those that race or are simply interested in the highest possible performance can still select from the range of specific glide waxes. The easiest option is to use a universal liquid or paste glide wax-these do not require an iron but of course, being proportional to the amount of effort involved, do not last as long.
Nordic equipment (Skating, Cross-Country): Here the benefits of a specific temperature wax over the universals mentioned above it are much more obvious. In our opinion it’s best to splurge on a couple of iron-in solid waxes for Nordic skiing, because more friction means more sweat inside your hat. After all, you don’t always go along with gravity’s wishes–sometimes you go uphill, where friction and suction have the biggest teeth. Muzzle them with a right proper waxing. Again, the simplest method is to use a universal liquid/paste glider, but they don’t last as long or perform as well as an iron-in hot wax (do you notice a theme here?).
How do I “hot wax” my alpine skis, snowboard or Nordic skis for glide?
Congratulations! This simply the most fun you will have with wax, ever. There are a few things you need before you can begin the process. Create a work space that is both heated and provides adequate ventilation. To inhale clouds of burning wax fumes is to veer sharply from the road to wellness, so at least keep a window open. Some device is needed to hold your skis or snowboard while you toil; a dedicated bench mounted with tuning vises is the most direct solution. Be a little afraid of $2.00 yard sale irons. The temp on a clothing iron often swings wildly between heating cycles , which leads inevitably to smoking wax and the potential for damaged ski bases. Specific waxing irons have accurate gauges with a range designed for wax, are lightweight and possess flat heating plates. The last tools you’ll require are a plastic scraper (plus a groove scraper for Nordic skis) and a nylon brush. Of course you need the block of glide wax you selected.
Clean the bases. Start with clean ski bases at room temperature. Glide wax Cleaner with a lint free rag is all you need, apply sparingly and wipe like you’re cleaning a counter. See the following section for tips on doing a more thorough cleaning. Using kick wax base cleaner is not recommended for gliding surfaces as it dries out the base that you’ve worked so hard to saturate with wax.
Mask the kick zone (if necessary). Put masking tape over the kick zone of classic cross-country skis to protect it from dripping wax, whether you belong to the waxless or waxable clan. Glide wax interferes with the binding ability of kick wax, and it takes the patience of a monk to clean out the waxless crown pattern should it become blanketed. Don’t get any glide wax in your kick zone. Alpine skis, snowboards and skate skis only possess glide zones, so you’ll be waxing the whole entire base in those cases and can obviously forgo the masking tape solution.
Warm the iron. Set your iron to the melting temperature suggested on the wax package. Too low a temp and the wax won’t melt and be absorbed properly, too high and it will burn and smoke and make you generally unhappy. Again, take our sage advice and purchase a dedicated waxing iron. Briskly wipe the iron surface as wax remaining from previous jobs liquefies so as not to mix different types. Let the iron warm for at least 10 minutes.
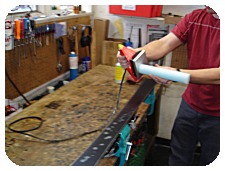 Melt & drip the wax. Holding the iron above the ski base, use your other hand to press the wax block against the heated surface. Moving steadily from tip to tail, drip beads of wax onto the ski base. It aids accuracy to tilt the iron and guide the molten stream off one of the corners. Droplets should be a tad smaller than dime-sized and be spaced roughly 1 to 1.5 centimeters apart. Don’t break out the ruler here and measure drop diameter, just keep on drippin’. Usually about three passes is enough, but exceedingly fat skis and all snowboards will need more to achieve adequate coverage. Fill in any bare spots you notice. Congrats, now your base is covered with dots of wax.
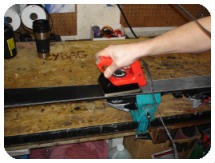 Iron the wax in. Make an initial quick pass or two with the iron to smooth out the droplets and pave the way for supreme wax absorption. Now move the iron in one continuous motion from tip to tail, melting everything together into a single happy layer. Moving it back and forth causes uneven heating that can damage the base. You will notice a molten trail chasing the iron, hardening as the wax cools; this trail should be roughly between 2 and 4 inches long if the temperature is set correctly and you are moving the iron at an appropriate speed. Don’t apply downward pressure to the iron, just let it surf along on the wax as it liquefies. It should take between 15 and 20 seconds to iron the length of the ski. Do two or three passes. Remember that you should never touch a hot iron to a bare ski base. Wax acts as an insulating shield, and this is why we recommend that beginners err on the side of too many drips rather than too few. It means more time scraping the excess, but its best to just avoid the risk of scorching and “sealing” your bases until you have more experience.
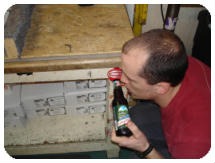 Have a beer / let bases cool. Let your boards cool at room temperature for about 15 minutes to ensure maximum wax penetration before scraping. Note: If you’re waxing with a cold, hard wax like Swix CH6 and below, do yourself a favor and scrape it while it is still warm from the iron, and then let your freshly scraped bases cool to room temp. If you let CH6 or CH4 fully cool and harden, you’l feel like breaking out a hammer and chisel to get it off. Anything above CH6, let the waxed bases cool to room temp. If you begin to rewax bases that are still warm, they can reach critical temperatures more quickly and become damaged. So take a deserved break. Start in on that sixer, but don’t get too far gone if you’re going to melt more wax.
Reheat the cooled wax into the base again (optional). If time permits, repeat the “Iron wax in / Have a beer / Let bases cool” process another 1 to 2 times (and quaff another 2-4 beers) before finally scraping. You’ve already dripped the wax, heated it and let it cool, and now you’ve got a nice smooth layer of wax just begging for another pass with the iron. You have no excuses! This will ensure that your bases are fully saturated with wax and your labour of love will have the most staying power. To repeat ourselves, it’s important to let the bases cool to room temp between each reheating of the wax.
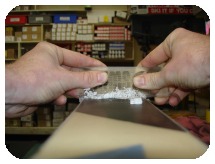 Scrape the wax off. Make sure you have a sharp plastic scraper with square edges. Purchase a scraper sharpening tool or flatten it on a file when it becomes dull. Hold the scraper properly. Support the middle with your thumbs and wrap your fingers around the edges. Angle the top of the scraper toward the tip of the ski and, using slight downward pressure and a long smooth stroke, pull the scraper down the length of the ski from tip to tail towards you. The goal is to peel of thin layers without gouging the base or altering its structure. Don’t over scrape. Rely on brushing to get the rest of it off. And don’t forget to scrape the central groove on Nordic skis.
Brush remaining wax away. Begin brushing with a Medium Bronze brush if you have one. This removes the wax from the structure of the ski (those tiny little grooves that help break suction). After several passes with the bronze brush, follow up with several passes with a softer nylon brush and then wipe down with a lint free rag. You are now ready to glide, after you clean up the mess you made. Hopefully nobody yells at you, but you deserve it if you used your mother’s clothing iron.
Can I use a regular clothing iron to wax my skis?
You certain can. But should you? Unless you are the most infrequent waxer, we strongly advise the purchase of a dedicated waxing iron. Let us compare the attributes of each side by side:
| Waxing Iron | Clothing Iron |
| gets hot and melts wax thick base with no holes for even heating temperature range / settings designed for glide wax lightweight construction accurate regulator that maintains a constant temp | gets hot and melts wax too all your silken slacks will hang beautifully |
Clothing irons are not designed to hold accurate temperatures. If you’ve ever ironed clothes (and most of us at O&B’s have not, so the following half-sentence is hearsay) you know that the iron cycles through a wide temperature range. You can hear the heating element click off and on as it struggles to maintain some semblance of consistency. This is certainly good enough for those Old Navy factory seconds, but not for your [insert large $ dollar $ amount] skis.
So why is accuracy such a big deal? The ski bases need to be heated to at least 200 degrees F (depending on the particular wax) before they begin to actually absorb anything. If they are heated much beyond 300, you risk “sealing the bases”, melting the pores in the base together and preventing future wax saturation (very bad). It doesn’t make good sense to touch your ski bases with an iron set to “Permanent Press,” especially when it’s a cheap-o big box store model. Nasty things will happen.
In summary, to use a clothing iron on skis or snowboards is to clip your fingernails with a chainsaw. We don’t like it, and neither would you.
But if you must wax on the cheap and insist on using a clothing iron (which will bar you forevermore from admittance into Valhalla), try it on the lowest setting and keep a vigil over it. We understand what it’s like to be strapped for cash. You can even buy a thermometer and check the actual iron temperature as it cycles around–all glide waxes have their optimum melting / absorption point printed on the packaging.
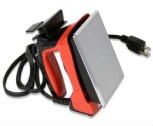 |  |
| A Waxing Iron The best choice… Ullr is pleased. | A Clothing Iron A “Linen” setting? Sacrilege! |
Kick Waxing
How about kick waxes for Nordic skiing? Proper application?
Kick wax is what provides traction on waxable cross-country skis. Each canister of wax is designed to function properly in a certain temperature range, because snow crystals change in character as the temperature fluctuates. Colder, drier snow tends to be harder with sharp edges. Warm snow is softer with rounder crystals. Traction is created when the crystals penetrate the layer of kick wax you so diligently applied. The wax must be soft enough to allow the snow to bite in for grip but not so soft that it doesn’t release the snow underfoot and allow easy gliding. To match the hardness of snow, colder temperature waxes are harder and warmer waxes are softer, just as it is with their cousin glide waxes. The temperatures described on the wax tins actually correspond to the snow temperature, but most of us simply use the air temperature as our wax-selection gauge; most of the time the two end up being roughly equivalent, but let your common sense guide you (or that of a friend, if your common sense so requires).
Crayon the wax over the kick zone of your Nordic skis by making longitudinal stripes on each side of the base groove. Try not to goop it on. Remember, if you possess kindergarten-level skills with a crayon, you should have no problems. Then use a cork with an even downward pressure to smooth it into a single transparent layer. To get the best possible and longest-lasting grip, try to add and smooth another two to four layers over the first. It takes a little technique and a soft touch to maintain the integrity of each layer. This method will force our foe friction to act upon one layer at a time rather than the entire wax job, and a smooth layer will glide easier than a thick and clumpy one.
Do give your skis fifteen minutes or so to adjust to the outdoor temperature and allow the wax to “set up” before you ski or you may find yourself hurling poles and stomping feet to remove clumped up snow.
How often do you have to reapply? Most people ski and then leave whatever remains of the kick wax on. If conditions are unchanged the next time you go, just strengthen the kick zone with more of the same. If temperature drops you should follow the peanut butter and jelly metaphor. Remove the softer wax using base cleaner and a scraper (not the same one you use for glide wax) and apply harder, colder wax in its stead.
Use a plastic scraper and base cleaner (applied sparingly) with a clean rag to remove old kick wax when necessary. Ideally you’ll lay down a fresh coat for every time out, but many of us will try to reuse a previous day’s wax job if it is not too dirty.
What is a "kick zone" and how do I determine it?
The kick zone (aka the grip zone or the wax pocket) covers roughly the middle 1/3 of a classical Nordic ski base; it is where the kick wax is applied on a waxable ski and it is where the fishscale grip pattern is located on a waxless ski. The remaining 2/3 of the ski base (the areas toward the tips and tails) are the glide zones.
The only skis that have a kick zone are classical Nordic skis, meaning those that employ the traditional “cross-country” skiing method of striding and gliding. Skate skis do not have a kick zone and therefore do not need kick wax. See the section on camber for more information on this.
There are several ways to determine the wax pocket on your Nordic skis:
- Easiest. The easiest way–especially if you are not big on precision–is to simply define the area from the back of the binding forward to the point 12 inches beyond the front of the binding as your kick zone, and apply kick wax there. Modify the length of your pocket as needed (more grip = longer pocket, more glide = shorter pocket)
- More Accurate. A more accurate method is the venerable "Paper Test", which can also be used to determine if skis are either too stiff or too soft. To do the test, the skier places the skis on a clean, flat (important!) surface and stands over (or steps into) the bindings. A friend takes a piece of regular old paper, places it under the ski (between the base and the floor), and slides it forward toward the tip of the ski until it stops. This marks the front of the wax pocket. The friend then slides the paper back towards the ski tail until it stops; this is the back of the wax pocket. Make a mark on the sidewall of the skis and define this area as your kick zone.
- The Bestest. The most accurate method (though if done right, the paper test gets pretty close) is to your wax pocket defined for you in the ski shop; we do this as a service to anyone who purchases waxable classic skis. The process is similar to the Paper Test but is done on a more accurate machine designed for such a purpose.
Remember that whatever method you employ to find your ideal wax pocket, it is still a changeable thing that can and should be adjusted to accommodate certain snow conditions, waxes, air temperatures, etc. It is certainly a valuable jumping-off point for tenacious grip. Enjoy!
I followed your kick wax advice but now I slip too much / don’t slide enough…what do I do?
There are two opposite scenarios bound up in this one question, the answers for which we will explore below:
Scenario #1: Skis are NOT getting enough grip (you slide backwards embarrassingly often and have little traction). There are a few possible explanations and solutions for lack of grip.
- Check the integrity of your kick wax job. Did you remember to crayon and cork in three or four thin smooth layers? If not, perhaps the snow surface has abraded it away. Be honest. Admit that you crayoned on a super thick layer because you were feeling lazy, and it quickly wore off.
- Extend your wax pocket forward. Sometimes you can get a more substantial kick by increasing the forward length of your wax pocket by two or three inches. See what happens. It may work great, it may do nothing, or your skis might begin sticking during your glide phase, depending on what the root cause of the problem was. Hopefully you brought some wax with you on your ski, otherwise you might try cursing at your ski bases.
- Try applying the next warmer wax over top. If you skis are still slipping, most likely the wax you chose is too hard for the snow conditions; the crystals are not sharp enough to penetrate the wax layer you have applied (this process is what gives you traction). So crayon a softer, warmer temperature wax on top of the current job and cork it in. That should take care of things!
- If all of the above fails, then maybe your skis are too stiff for you. Calmly remove your skis, posthole your way to the nearest cliff, and throw them off. Or, bring them into Omer & Bob’s and let us have a look–then let us recommend a cliff if need be. A ski that is too stiff will not “close” when you put all your weight on it, meaning you will not be able to force the entire kick zone flat against the snow to get traction. You could also try gaining some weight, which is easily done if it is still pre-Holiday Season.
Scenario #2: Skis are getting TOO much grip (snow builds up underfoot, or your glide is sticky and slow). Try the solutions below, before you lose your cool.
- As above, it is better to cork in several smooth, thin layers than a big goopy one.Make sure that is the case. Also, it helps to remove old kick wax with base cleaner and a rag (it picks up pine needles, grit, bark, etc.) because snow sticks readily to a dirty wax job. It is best to clean your kick zone and reapply (even if the wax is the same) each time out, though the necessity of this depends on the duration of your skiing and the quality of the snow.
- Make sure that you didn’t choose too warm of a wax for the conditions, because this is common cause of snow packing up underfoot. Warm waxes are softer, and if the snow crystals are colder and sharp, they will penetrate the wax layer (good) but will not readily release when you begin to glide (bad). Scrape off the wax and try something colder.
- Obviously you might want to make sure you’ve GLIDE waxed your skis recently, though choosing the correct glide wax is not as important as choosing the correct kick wax in Nordic skiing.
- If you’re on waxless skis, make sure you’ve applied a liquid or paste wax to the entire ski base recently. Snow will ice-up and bond to a waxless pattern that is dry and oxidized, creating more friction and headache for the skier. You want those bases to look like a well-oiled iron skillet, midnight black (folks with white bases should not be offended). Make sure you do this every 20 miles or so.
- Lastly, your skis could be too soft for you. I know you don’t want to hear this, but you may be too heavy for the camber of your skis. When both skis are equally weighted, the wax pocket should ideally be hovering off of the snow, so it does not slow your glide. A skier who is too heavy for the skis will compress the camber too easily and though the skis will grip and climb well, they will not provide that effortless glide we all seek. Come into the store and let us check your setup out.
The kick wax tins have two temperature ranges, one for new snow and one for transformed snow. What does it mean?
The two sets of temperature ranges are typically revealed like this (the example below is from SWIX V30 BLUE:
"New" refers to freshly fallen snow that possesses relatively sharp and pointy crystalline structure. Kick in these conditions is best achieved with a harder wax, one that will allow the crystals to penetrate for grip while being hard enough to shear them off during the glide cycle so they don’t ice up underfoot.
"Transformed" snow has gone through one or more melt/freeze cycles, and has lost its crystal structure. This makes it softer and gives it a higher water content. In these conditions, a softer wax is required; this is why the transformed snow temperature range reaches much lower than the newly fallen one.
Are you confused, enlightened, or both? Here is a hypothetical winter scenario to help put the above theories into practice.
The two waxes we’ll refer to are Swix V30 Blue (NEW: 14-28°F, TRANSFORMED: 5-23°F) and Swix V20 Green (NEW: 5-18°F, TRANSFORMED: 0-12°F). Imagine it is mid-January, and its the morning after 10" of powder, with a temperature of 10 degrees. A bit chilly, but hey, winter is supposed to be cold. You kick wax up with V20 Green and hit the trails, not forgetting your thermos of hot chocolate. For the rest of the week, daytime temps remain in the lower teens and so the snow remains powdery and dry. Keep on rocking the V20 Green. Over the weekend, the temperature climbs into the 30s and then has plummeted again by the middle of next week with no additional snowfall. The snow has changed in character; it is a little crusty, and the crystals have softened and rounded slightly by the weekend temps. You now choose the warmer of the two waxes, V30 Blue, which should give you more effective kick in these transformed conditions. Voila! You’re well on your way to learning how to read Mother Nature*.
*Mother Nature neither supports nor endorses this document.
In your store’s kick wax display you’ve got "natural" corks and "synthetic" corks…what is the difference?
True, this is not a frequently asked question, but it might be asked someday, and if you read onward, you may be prepared to answer it! First of all, "corks" are used by Classical Nordic Skiers to smooth kick wax in the "wax pocket" on the base of their skis. The purpose of a cork is to create enough friction to melt the wax that was crudely crayoned on into a long-lasting glassy sheen.
A natural cork actually comes from a certain kind of Oak tree of European origin, whereas synthetic corks are a petroleum product. So it’s much like being asked, "Paper or plastic?" at the check out line. Synthetic corks tend to work better because they are able to more easily generate friction. But some folks like to do things the old fashion way, and so we have both. If you’ve read this far, it is probably 3 a.m. on some humid mid-July morning…go back to sleep.
Base Prep and T.L.C.
What do you recommend for new ski base prep / pre-season prep on my existing skis?
The first thing to understand is that new skis have an insatiable appetite for wax. After all, they’ve been wandering through a veritable snowless desert since caps were pressed and crown patterns cut. Factory. Box. Packing tape. Delivery truck. Storage. Ski shop. Display. A new ski is a confused ski. Having never felt or even imagined snow, philosophical questions like "What is my purpose?" and "What’s it all for?" must rattle it deep to the wooden core. It can’t realize its gliding potential without a lot of positive encouragement (read: waxing) from you, their owner. Microscopic spaces exist between the molecules of polyethylene in the ski base, and subsequent waxings fill these spaces, lending the wax’s water repellent and friction-reducing properties to the base itself. The more hot wax applications, the better prepared and more saturated the base is for sliding over snow. The method below is recommended both for brand new skis and also as initial pre-season maintenance. Here’s how to tackle it:
Prepare the bases: Before any application of glide wax can occur, you need to start with clean bases in the same way you would never oil a dirty bicycle chain. A new base has dirt and grit and other friction-inducing materials imbedded within. Skied-on bases additionally harbor old fugitive wax in their pores. Wiping with a fine-grained fibertex pad will pull some of the small particles out, and making three or four long strokes with a bronze brush helps to open up the P-Tex to receive wax. If you have classical Nordic skis, sand the grip zone with 100 or 150-grit sandpaper; a roughed-up kick zone binds better to kick wax. Don’t forget to cover the kick zone with masking tape to protect it from the glide wax. If lack fibertex pads (you probably have "Scotchbrite" pads under your sink–you can use those if you want) or a bronze brush, skip that stuff and worry not.
Clean the base: For the glide zones, using a glide wax cleaner is the best and easiest option. It is formulated to help remove the dirt and dust without pulling out the wax thats already on your skis and is more gentle on your skis bases than the following hot wipe method. Just apply the glide wax cleaner, let it sit for a minute and wipe down with a lint free towel like Swix Fiberlene. You will be surprised at how much brown stuff ends up on your towel even on new skis. Don’t use regular base cleaner on the gliding surfaces, its great for cleaning the kick wax off skis but will dry out your gliding zones.
Apply a the base wax: Now that your bases are sparkling clean, iron at least two or three layers of the soft wax you chose above (CH10, Base Prep, Universal Warm) for the hot-wipe. The more the merrier and the faster your ride will be. Check out the hot waxing tutorial if you need a refresher. Once you’ve saturated the base with the warm wax, move on toward the wax of the day. The overarching theory is that the wax with a lower melting point will help to draw harder waxes further into the base when you apply them over top, acting as sort of a lubricant in this process.
When and how should I clean my bases? What is the "hot wipe" cleaning method?
If you are talking about a gliding surface, using a glide wax cleaner is the best and easiest option. It is formulated to help remove the dirt and dust without pulling out the wax thats already on your skis and is more gentle on your skis bases than the following hot wipe method. Just apply the glide wax cleaner, let it sit for a minute and wipe down with a lint free towel like Swix Fiberlene. You will be surprised at how much brown stuff ends up on your towel. Don’t use regular base cleaner on the gliding surfaces, its great for cleaning the kick wax off skis but will dry out your gliding zones.
The traditional cleaning method is to perform what is commonly known as a "hot wipe." This involves melting a layer of soft wax into the ski and then, while it is still hot, scraping and finishing with a rag to remove all the remaining wet wax. Do this twice, ironing in and hot-wiping a second layer to be thorough. Any of the warmest waxes will work for this. The wax will penetrate deeply into a base and simultaneously cause old wax and dirt to be brought to the surface. Most folks use the "hot wipe" to clean brand new skis or to prep skis / boards at the beginning of the season.
What is the best way to store my skis through the summer months?
P-Tex is prone to oxidization and if improperly stored, can dry out. Dry bases lose their wax-absorbent properties and gliding performance suffers. The easiest way to prevent this is to iron in a low-temp glide wax like Swix CH10 or Universal Warm and let it dry without scraping. The layer of wax acts as a protective coating as your skis sleep through the hot summer months. When all is right and white again, a few scrapes is all it takes to revive them from stasis and suddenly you’ll be skiing again.
Gear Up for the Slopes
Refresh your essential snow gear while you're getting your skis or snowboard ready for the season. We have an excellent selection of helmets, goggles, and more from top brands. Shop online and pickup your items for free on your next shop visit.